Savvy Mum creates incredible DIY dolls house for her daughter – with electric lights!
A labour of love

Looking to treat your little one to a toy they'll treasure for years to come? Why not try your hand at this DIY dolls house.
Related: DIY fan paints her dining table and adds marble adhesive top – now it looks brand new!
Here at Ideal Home we're fans of a pretty dolls house. A mini home you get to decorate, what's not to love?
However, dolls houses don't come cheap, with some costing as much as £300. But one clever mum created her daughter a dream dolls house, complete with working lights for £120.
The DIY fan stunned members of the Extreme Budget DIY and Life Hacks Facebook with a photo of the handmade pale pink dolls house.
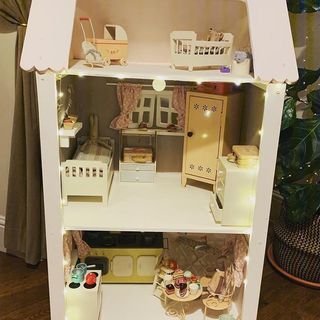
'As soon as my little girl was born I intended that one day I would make her a dolls house,'Rebecca Menzies told Ideal Home. 'I wanted something that was made with love, that I could watch her enjoy for many years.'
'Hopefully, one day, I may even get to see my grandchildren play with it too,' she adds.
Rebecca brought 5 pieces of MDF from Homebase, 4 thick pieces and one thinner piece. She also picked up strips of wood to use as shelves and window sills before starting the project.
'I had an image in my mind of what I wanted to create and a loose idea of how I would make it,' Rebecca explains. 'The size of the house I detemined by the space where the house would live.'
Follow the step by step below to see how Rebecca built this charming dolls house.
Step-by-step DIY dolls house
1.Measure and cut the back and two side panels to size. Lay them out alongside each other and draw were each floor will sit on in pencil.
2. Draw outlines for the windows in pencil. Drill a hole in the corner of the window, then use a jigsaw blade to cut the windows out.
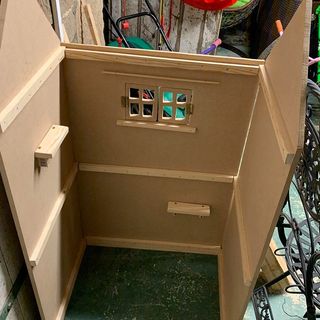
3. Nail strips of wood to the back and side panels along where the floors will sit.
4. Screw the back and two side panels together.
5. Starting at the bottom, attach the thinner MDF to the strips of wood already in the house to create the floors.
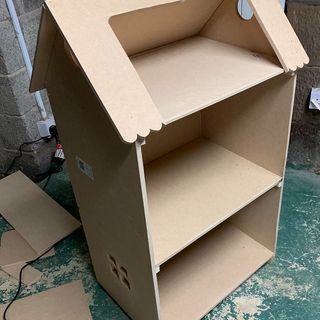
6. For the back of the roof, cut MDF to size and pin it in place.
7. Create the front panel out of two L-shaped pieces of MDF. Hide the join in the middle with white filler. 'I designed the roof so I didn't have to use a mitre cut at the roof peak,' explains Rebecca. Instead she was able to simply rest the front piece against the back.
8. This stage is all about sanding. Use an electic sander and sheets of sand paper to remove all the sharp edges and rounding of the corners.
9. Cut strips of wood to create shelves and window sills, and attach them to the house.
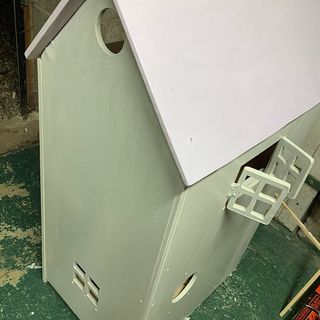
10. Paint the dolls house. Rebecca kept costs low by painting the dolls house with paint she already had lying around the house.
All that is left is to do is furnish the dolls house – our favourite part!
How to furnish
To create the adorable little curtains, Rebecca used screws to attach thin pieces of dowel as curtain poles. She then ran the curtains up on her sewing maching.
'For the curtains, measure the windows and then double the measurements for your fabric,' she explains. 'Sew the bottom seams first, then the top. Allow a space to pass the dowel through.'
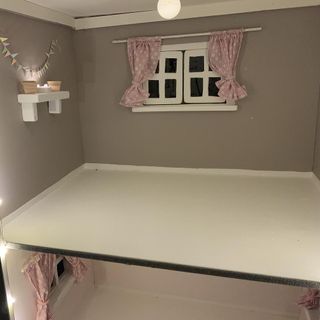
The dolls house was finished off with dinky doll-sized velcro lights from Amazon. Rebecca also hung a string of wire battery lights around the roof and down the front.
For the furniture Rebecca used Maileg toys she'd been collecting since her daughter was little.
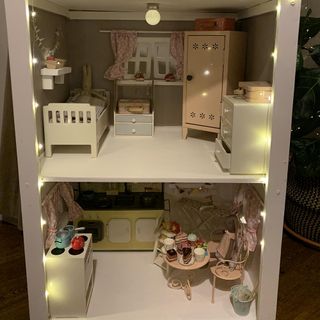
'I had all the furniture I needed. All saved and carefully wrapped and stored for three years until I felt she was old enough,' she explains.
Related: DIY fan shares ingenious tile transformation using adhesive – costing from only £18
We're sure her daughter loves her new dolls house. Are you bold enough to create a dolls house from scratch?
Get the Ideal Home Newsletter
Sign up to our newsletter for style and decor inspiration, house makeovers, project advice and more.

Rebecca Knight has been the Deputy Editor on the Ideal Home Website since 2022. She graduated with a Masters degree in magazine journalism from City, University of London in 2018, before starting her journalism career as a staff writer on women's weekly magazines. She fell into the world of homes and interiors after joining the Ideal Home website team in 2019 as a Digital Writer. In 2020 she moved into position of Homes News Editor working across Homes & Gardens, LivingEtc, Real Homes, Gardeningetc and Ideal Home covering everything from the latest viral cleaning hack to the next big interior trend.
-
 How often should you mow your lawn? A month-by-month guide to cutting your grass, according to experts
Are you cutting your grass enough?
By Lauren Bradbury
-
 How to grow mint from seed – expert tips for super easy (and tasty) herbs on tap
Amateur gardeners, assemble! Here's how to grow mint from seed like a pro...
By Kayleigh Dray
-
 How to care for a lawn in shade – expert tips for lush green grass in a shady garden
Shady garden? No problem! You can still have the lawn of your dreams with just a few tweaks...
By Kayleigh Dray